The Best of the Joy of Painting with Bob Ross
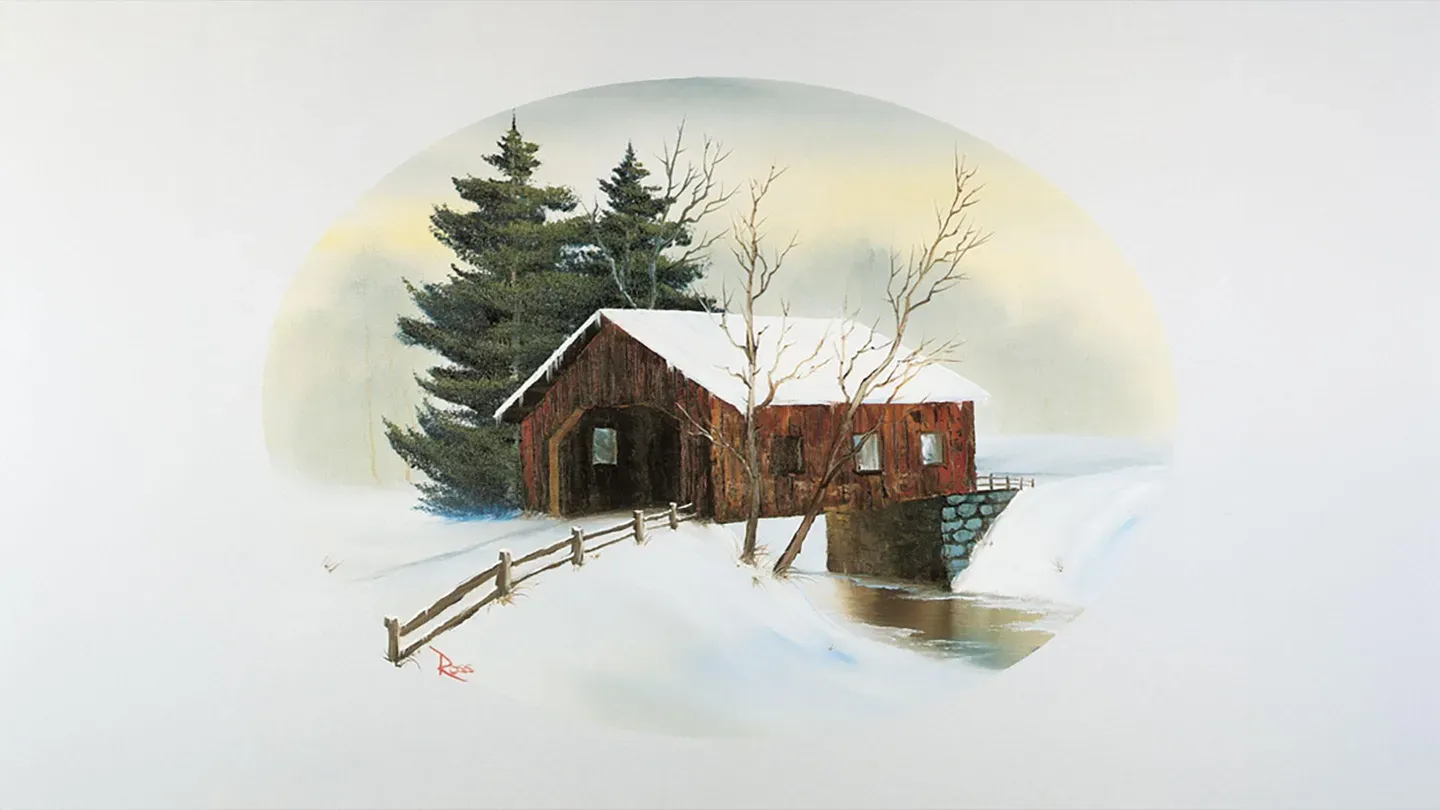
Covered Bridge Oval
Season 41 Episode 4123 | 27m 15sVideo has Closed Captions
Cross a frozen stream under the shelter of a covered bridge with Bob Ross.
Cross a frozen stream under the shelter of a covered bridge and enjoy the tranquility of a beautiful winter's day -- a Bob Ross classic!
Distributed nationally by American Public Television
The Best of the Joy of Painting with Bob Ross
Covered Bridge Oval
Season 41 Episode 4123 | 27m 15sVideo has Closed Captions
Cross a frozen stream under the shelter of a covered bridge and enjoy the tranquility of a beautiful winter's day -- a Bob Ross classic!
How to Watch The Best of the Joy of Painting with Bob Ross
The Best of the Joy of Painting with Bob Ross is available to stream on pbs.org and the free PBS App, available on iPhone, Apple TV, Android TV, Android smartphones, Amazon Fire TV, Amazon Fire Tablet, Roku, Samsung Smart TV, and Vizio.
Providing Support for PBS.org
Learn Moreabout PBS online sponsorship[music] Hi, welcome back.
Certainly glad you could join me today.
I thought today we'd do the little, the little painting that you see at the beginning of each show.
The little covered bridge.
So I'll tell you what, let's start out have them run all the colors across the screen that you need to paint along with me.
And they'll come across, as usual, in the same order as I have them on the palette.
So I tell you what, let me tell you what I've already done up here.
I've got my standard old pre-stretched canvas up here.
And I've just taken and cut an oval out of a piece of contact paper and just stuck it on there.
Then I've covered the center of it with just liquid white and it's wet and slick and ready to go.
So, let's just have a good time today.
Let's start maybe with a little, small, small amount of the cad yellow.
And I'm going to put a little, tiny, tiniest little amount of the yellow ochre in with it.
Tiny little bit of color.
And let's go right up in here.
And up in the sky, let's just put in a little bit of that yellow color.
Now, we want to do a sky today that's very nondescript.
It doesn't pull your eye away from the center of interest.
But we do need something in the background.
So this is a simple way of doing a very nice, little sky that you won't even notice is in the painting when it's done.
Okay, without cleaning the brush, let's go into a very, very small amount of the midnight black.
Takes very little.
Just a tiny bit.
There, that's good.
Let's go back up here.
Now right at the top, we'll put in a little bit of that black color.
And just let it blend right down into the, right into that yellow ochre and cad yellow that we have on here.
But very quiet.
There.
And tap in the indication of a little, little stringy cloud here and there.
But once again, if this gets too much going on, it's going to distract you from the main interest in this.
We'll just use that same old brush.
Heck, we'll go right into a little bit more of that black.
Very, very small amount.
Now you could do this with a round brush or a one inch brush.
I'm going to use a two inch, since I have it.
Tap a little bit of color right into the top bristles here.
We want to make some little trees that are far back here in the distance.
Some little background shrubbery.
That's basically all we're doing.
Just some little background things, like so.
But very, very quiet, nondescript.
Once again, you should hardly even notice these are in the painting.
But you need something back there behind your little covered bridge.
There.
A little touch more of the color.
And wherever you want them.
There we are.
We film the shows in Indiana.
There's a lot of beautiful covered bridges here in Indiana.
In fact, I've worked, done some demonstrations, at a couple of covered bridge festivals that they have here.
There.
Okay.
Give us just some very subdued little indications.
All right, all right.
Let's take, let's take the old liner brush.
I want to take the least, least amount of the dark sienna on the liner brush.
And this paint should be thin, like ink or water.
Very, very thin.
I don't want much color in it.
Turn the bristles.
That brings them to a nice, sharp point.
There we are.
Let's go up here.
And maybe here and there in our world, we're going to put the indication of just a little stick and a twig and a trunk.
You know, those little things in here.
Don't worry about a lot of detail.
Just want the indication here and there.
Wherever.
There.
Okay.
And that quick, we've really got all we need.
If we get too much more, it's going to distract the eye.
And that's not what we're looking for today.
We want this to be very subdued and very quiet back there.
Now, we had a little snow in that painting.
So let's take, I'm using the same old brush, I had such a small amount of color on it, we can go right into the white and it won't even show.
Let's go right back in here and decide.
We got the titanium white on the brush.
Let's decide maybe where the snow is.
Just grab it and pull.
Now somewhere right over in here, there's a little stream, because that's the reason there's a covered bridge there.
So remember that the lay of the land is probably going to, [Bob makes "zoop" sound] go down like that.
So.
That should always be in your mind when you're putting this in.
This doesn't show much now, but as we put other colors in there, then it'll begin to show.
On this side, maybe it comes over, and drops down over here somewhere.
But all we're doing is just basically applying a little bit of white onto the canvas.
There.
Okay.
Now we'll worry about fixing that all up later.
It's just that we want this behind the bridge, so we need to put it in first.
Now then, at this point, I'm going to take and start scraping out a basic idea of where this covered bridge is going to be.
Maybe he's going to live right in here somewhere.
That'll be his roof over in here.
There comes the eave on the far side.
It's just like making a big cabin.
Something like so.
Maybe if I put a little tiny, tiny bit of color on the knife, you can see that better.
I can see it here, but I don't know if you can see it at home on the TV.
Maybe, see, it comes right out, something like so.
The only reason that we're doing this is because I'm going to put some big, huge evergreens in here, and I don't want that color to get up here on the roof, that's going to be white, covered with snow.
Because if it does, then you're going to end up with green snow.
That's the only thing that's worse than yellow snow, is green snow.
See and you could just go right on like this, and lay in the whole basic idea of your little bridge.
There we are.
Now then, let's go back in here.
I'll take some black.
Let's use some Prussian blue.
Prussian blue, very strong, dark color.
A little Van Dyke brown, even a little alizarin crimson.
We'll just mix all that in there.
There we are.
Okay, let me clean off my knife.
Just wipe the knife on the old paper towel.
There.
Just load the fan brush full of color.
Now notice, I did not put any green in this at this point.
Because once again, I do not want a lot of green in this painting.
Now then, we have our basic structure.
I think we had one tree that was about here.
So you can put in a center line.
Now push upward with a brush.
These are great big full trees so push upward.
There.
Create all those beautiful branches that stick out here.
Push quite firmly and think about individual branches that just protrude out from the side of the tree.
Now we're getting close here, so just sort of work around it.
Doesn't matter if you get a little in there.
But we don't want this whole, big gob of color, stuck right out here on our building.
A little bit up in here.
There.
Isn't that a super nice way of making a big old tree?
It's very easy.
You can do this.
Just push it upward.
There.
Okay.
What we need for this tree to have a friend.
Let's say this friend lives, yep, right there.
Once again, push upward.
There.
I like this painting because it's dark, dark contrast here stands out like a sore thumb.
And that's what makes your painting interesting, the play of light against dark, and dark against light, and on and on and on.
That's what really makes your painting special.
Now we can take a little touch of white, a little dark sienna mixed in it.
And we can go up here, and we'll put the indication of a little trunk here and there.
See, that's all you need.
It's really all we need.
Now then.
If we wanted to put a little green on here, what we'll do, I'll just leave this dark color on the fan brush, and I'll go right into some yellow ochre and a little cad yellow.
But I don't want a lot of green in this painting.
Once again, winter scenes, I try to avoid a lot of green.
But it's a very, very dark green.
Very dark green.
Now we can go in here and just pop in.
Pushing upward the same way, a few highlights on these.
Don't overdo though.
Once again, you'll lose that beautiful, beautiful darkness that's here.
And with a painting that has snow in it and all this much white, it's this dark that really makes these trees stand out.
There.
On this old tree, a few there.
Like so.
There we are.
Okay, I think that's about all we need on that.
Shoot.
Now then, we can take our brush that has the white on it, and we'll come right down here at the bottom of this big tree, and I want to pull a little touch of that color.
Very small amount of it out.
And think about the angle here that we had for our snow.
Just a small amount of that color, so it looks like there's a shadow under that tree.
There it is.
Because the canvas is wet, you can move that color.
Okay, now then.
Let's go back in here and begin adding in, adding in all of our browns and stuff.
And all we're doing here is just, just laying in color.
Just laying in color.
There.
Okay, now then, we can come right down, [Bob makes "tchoom" sound] This is where the fun starts.
Because this you can do any old way that you want to do.
You're really just blocking it in here.
Just throw it in.
Just throw it in.
All right.
Now then, decide where the front of this is and we'll just do a bridge-ectomy.
See, comes right across like that.
That gives us a basic shape for our bridge.
Now then, this is going to be the side of the bridge, we'll start filling it in.
There.
Okay, just pull it down.
Pull it, now we'll go about to here, pull that down.
Now then, we need the bottom of this to be nice and straight and smooth.
So for that, I'm going to touch and pull upward.
So to have an idea of where the bottom is, touch it and pull.
There.
Okay, that gives us a nice straight edge along the bottom.
Then all we have to do is just sort of fill it up.
Fill it in.
There.
Okay.
Now underneath that we had some very dark color, because there's some stones and stuff that hold all that up.
It comes under something like so.
And then we had a little water.
So, under here, that's reflected right down into the water.
So you can just continue that.
This is basically just Van Dyke brown.
There.
And our water's going to live right along in here somewhere.
I don't know exactly yet.
Somewhere right along in here.
There.
But whatever's going to be water, we'll just grab the big brush and pull that straight down.
And that'll end up being our water area.
Okay, and gently go across.
[chuckles] And we, already it's beginning to have that impression of water.
Now then.
See, maybe this hangs out a little further here.
And there's a bank over on the side, and it sort of comes around.
All right.
Now then we can start having some real fun here.
I want to darken that one area a little bit underneath.
Ooh, that's much better.
I like it better.
See, now you can see that reflection.
Okay.
Let's make this a combination of some bright red, a little dark sienna, a little touch of yellow ochre, and maybe a little bit of white.
But don't over mix it, leave it sort of marbled like that.
Take our little roll of paint, and let's go right up here, and just touch and begin pulling down, very gently.
Very, very gently.
There.
And from down here, I'm going to gently do the bottom and pull up.
Once again, I need a nice straight edge at the bottom here.
So I don't want to lose that.
Just sort of pull it up.
Just like so, see?
Grab it and go upward.
You can go either direction.
Upward or downward.
There.
A little from here and down.
Now then.
Something like, so I'm going to take just a touch of the yellow ochre and just highlight it here and there.
Maybe even a little touch of white here.
Oh, that's nice.
That's nice.
Look at that, looks like old wood already.
Old, old wood.
But leave it sort of old looking like that.
Don't overdo.
Now then, on the other side, I'm going to add the same color.
I'm going to add a little dark, I mean Van Dyke brown to it to dull it.
I want this side to be less bright.
Not as bright as the other.
There.
Just pull it down, let it break.
Just like you're painting mountains.
That's all there is to it.
Now.
Now we had a, you've got to have an entrance way to get in here.
So basically, figure out where that's at.
And we can just begin scraping.
And I'll tell you what, I'm going to get the little knife, I like it better.
It gets in these little areas.
We've got a door like so.
Comes over and down.
There we go.
There's our doorway.
Now we need to fill that up full of dark color, so it looks like it's very dark inside there.
Not a lot of light's going to get in.
There.
Okay.
[chuckles] Isn't that neat?
Now then, we'll take, we'll take, let me see here, I'm going to add a little yellow ochre, a little touch of brown and white.
We'll make the side there so you can see it.
See?
A little across the top.
Over there, just a little outline.
Now you've got an entrance way.
I want a window back here.
So to make a little window back here, I'm just going to take and pull.
Just pull it.
There's our little window, right there.
Just like so.
You can see right through that, and they have a little window.
Now we take a little of our highlight color, and just go around the edges.
There.
Now, tell you what.
Let's take a little of Van Dyke brown, and in here, I want to make this look like old boards.
Just take a little brown and touch here and there.
Mm.
There we are.
Now then.
Let's have some windows out here.
Let's have one right here.
Just pull it down, like so.
Now, in my mind, in this window here, you couldn't see anything.
There would be no light hardly coming through it, because it's dark right in there.
Now they may well have a second window.
A lot of these old covered bridges have windows in them.
Maybe there's another one here.
But now in these, in my mind, because you're looking through at sort of an angle there, you would see a little bit of light coming through.
So we'll just put a little light in there.
A little light in my window.
A little light in my window.
Isn't that what everybody wants?
[chuckles] There we are.
Now then.
Now then, let's put some snow on the roof.
[chuckles] If it's wintertime, there's going to be a little snow up there.
There now, we just come right along here.
See, this is the reason we didn't want to get those trees all down in the roof area.
Because when we pull this snow down, we'd of ended up with a tremendous amount of this color.
So be sort of careful there when you do that.
Make you unhappy if you end up with a bright [chuckles] green roof on your covered bridge.
Now very gently, following the angles.
You can just pull that right down.
This old knife'll do fantastic things for you.
Just follow those angles though.
There.
See there?
Okay, right on down.
[Bob makes "shwoop" sound].
Okay, a little more color.
Now you can take a knife and just sort of smooth that all out.
All right.
Good.
And that easy, you can make a nice, snow covered roof on your covered bridge.
And as I say, it's basically just like making a cabin only big.
Certainly is a big cabin.
Now then.
We can take a little bit of our dark color and just very carefully fill in these little areas here.
So the tree fits right up against there.
Okay, we got that.
Take our knife then, and we'll put a little snow on this side of the roof.
See?
And that brings it all together.
That easy.
That easy.
You have a very nice little thing.
There.
All right.
Now then, over here, let's have some stones that hold all this up.
For that, I'll just take some white, a little of the midnight black.
There we are.
A little, tiny touch of phthalo blue.
Not much, not much.
Mostly black and white.
Maybe a little touch, there, that's what I'm looking for.
Something like that.
Now, take the little edge of the knife, and let's just put an indication here of a few little stones.
Want them basically straight across the front.
And you just drop them in.
Like that.
You can make them sort of different sizes.
Shoot, when these old covered bridges were built, they'd use whatever size stone that happen to be laying around.
Now then.
Over in here, we'll just put the indication.
This is in shadow, underneath.
So, you're not going to see many stones under here.
Though you might get the impression, here and there, of one or two.
Maybe even the least, little touch of yellow ochre.
Because there'd be a little light coming through the side over there.
There.
Just enough to sparkle a little.
There.
Mm.
Very nice.
Okay.
Now if you want to really make that look like stones, we take our liner brush and we'll go into a little bit of titanium white, dark sienna, mixed together.
And a little black.
Put some black in there to grey it down real, ooh, there were are.
That's what I'm looking for.
That's what we're looking for.
Okay, let's go up here.
Now you take a liner brush and just sort of very quickly, go around each stone.
And that will give you the illusion of stones that are put together.
There.
You know this one's been in the opening of every show in this series with a little cartoon character.
It only takes a couple of minutes to paint it, but it takes a lot of fantastic people a long time to make that beautiful, little opening.
So, I really hope you enjoy it.
Really hope you enjoy.
Hope you like that little cartoon character, too.
Hope you like that.
We're thinking about making maybe a full length cartoon out of him.
Turn him loose on the world.
If you'd like to see that, let me know.
I'd be interested in knowing if you'd like to see, my young friends especially, if they'd like to see cartoons made with him.
Let's come right up in here and grab this.
I'm going to take least little touch of the black, mostly titanium white.
And I'm going to put a little shadow over in here.
You need that shadow so you can put a layer of white right here and it'll show.
Now we'll take pure titanium white and we'll make the other side, see?
Now, because you have that shadow, that stands out.
Bring that right on down.
[Bob makes "tchoooo" sound] Almost down to the water there.
Right down to the water.
There we are.
Okay.
And then just smooth it out.
There.
Over here now.
Let's grab this.
Add a little bit of black.
There.
And we can begin making our little road here that goes right up to our covered bridge.
There we go.
Now, let's have a hill that comes over this way.
So just by changing this angle here, maybe the snow comes down and goes right across like that.
See there?
I'm going to take the least little touch of that phthalo blue and add right in here.
Least little touch though.
Smallest, smallest amount possible.
And when we come back over that, that'll look like a little shadow area in there.
It'll make a little recessed area there in your snow.
All right.
Now just take the brush, and smooth it out.
Okay.
Take a little grey on the knife.
And you can put an indication of, maybe the snow's a little higher over there.
Just bring it right up.
Like so.
There.
While I have that going, I'm going to take a little bit of that titanium white.
Put the indication maybe this is frozen.
Who knows, who knows.
A little bit of a waterline right out through here.
A little over on this side, too.
Should have put that in before I done this.
But that's all right.
We'll just take the big brush here, bring it right back in.
See, we don't make mistakes, we just have happy accidents.
Now then.
Let's take our liner brush.
Liner brush, liner brush.
A little touch of Van Dyke brown.
And maybe over here we can see, come right up in here, we can see a little bit of the fence.
[Bob makes "tchoom, tchoom" sounds] This is just to keep, sometimes we party a little too much and, maybe if it wasn't for a little fence here when we come through the bridge, we'd sort of, plop, plop, fall down in the water.
You know how that goes.
All right.
Let me take a, some liquid white, put a little yellow ochre, a little dark sienna in it, and just mix it up.
It's very, very thin.
Very thin.
And we'll take our liner brush, dip it in paint thinner, go into the Van Dyke brown.
Then I'm going to take the other side and go right through that thin paint that we made.
So we have dark on one side, light on the other.
Let's come right up in here.
And let's put in our little fence on this side.
And we'll let it get bigger and bigger as it works out here.
There.
See there?
There it is.
Just a little, little thing there.
And there's always a few little weeds grow around these because you can't cut real close to the post.
And if you're like me, you're lazy, you look for a reason not to.
Okay, same old double loaded brush.
We can come right back in here.
Put in our little rails.
[Bob makes "tchoom" sound] There they are.
See there?
[Bob makes "tchoo, tchoo" sounds] Shoot, maybe some of these are almost down in the snow there, because the snow's deep.
This is an Indiana covered bridge, it's really deep.
Okay.
A little touch of the liquid white, put a little snow, [Bob makes "tchoo" sound], right up on the top of these little rascals.
Just like that.
Now then, I'm going to go right back into the brown.
Maybe, we had a, think we had a couple of trees that lived right up through here.
There they go.
Just some happy little trees that live here.
A few little branches here and there.
There they are.
This old tree here.
He's had a rough life.
He's like me, he's really had a rough one.
Maybe he had a friend, if I remember.
Yeah, friend goes right up through here.
There.
There we are.
He comes right on out.
Lot of paint thinner though on this will just flow.
See?
Switches and branches and limbs, it's sort of scary going right over your little bridge that you've worked so hard on.
But that's what'll make it really nice.
Down at the bottom here, we'll put a few little weeds and stuff out here.
There.
Tell you what, [chuckles] this is the moment of truth.
Let's take the contact paper off, and see what we have here.
Pull it off.
Voila, there it is.
Isn't that something?
Now maybe in our world, tell you what, maybe there's another post that lives outside here.
He stands right out, just outside the oval.
He got away.
Take a little touch of the liquid white.
Put right up on top.
Maybe, a little, little weed out here, too.
Who knows.
Something like so.
Shoot, I think we about have a finished painting.
Take a little red.
Let's come right along in here, and we'll sign this little rascal.
Hope you've enjoyed.
It'll give you a little challenge, especially if you do it in 30 minutes.
But at home, you can take your time.
Let me hear from you.
Let me know how this goes for you, okay?
You have a super day, and from all of us here, happy painting and God bless, my friend.


Distributed nationally by American Public Television