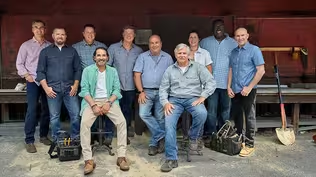
E5 | Planting Arborvitae, Storage Rack | Ask This Old House
Season 24 Episode 5 | 23m 42sVideo has Closed Captions
Planting arborvitaes; fireplace tools 101; how to build a container tote storage rack.
Lee Gilliam helps a homeowner plant a row of arborvitae trees for a privacy border; Mark McCullough breaks down the various tools that can be found in the average fireplace set; Tom Silva and Kevin O'Connor demonstrate how to build a simple, cost-effective storage rack for container totes using 2x4's.
Problems playing video? | Closed Captioning Feedback
Problems playing video? | Closed Captioning Feedback
Funding for Ask THIS OLD HOUSE is provided by The Home Depot and Renewal By Andersen.
Support provided by:

E5 | Planting Arborvitae, Storage Rack | Ask This Old House
Season 24 Episode 5 | 23m 42sVideo has Closed Captions
Lee Gilliam helps a homeowner plant a row of arborvitae trees for a privacy border; Mark McCullough breaks down the various tools that can be found in the average fireplace set; Tom Silva and Kevin O'Connor demonstrate how to build a simple, cost-effective storage rack for container totes using 2x4's.
Problems playing video? | Closed Captioning Feedback
How to Watch Ask This Old House
Ask This Old House is available to stream on pbs.org and the free PBS App, available on iPhone, Apple TV, Android TV, Android smartphones, Amazon Fire TV, Amazon Fire Tablet, Roku, Samsung Smart TV, and Vizio.
Keep Exploring


This Old House Insider Newsletter
Get This Old House exclusive stories, tips, and behind-the-scenes information delivered right to your inbox every month.Providing Support for PBS.org
Learn Moreabout PBS online sponsorshipKevin: On "Ask This Old House," our experts travel across the country to answer questions about your house.
♪♪ Today, Lee helps a homeowner create some privacy using arborvitaes.
Lee: What do you think?
Rhonda: It's beautiful.
I love it!
Kevin: Then Mark is talking fireplace tools and the function of each one.
And this simple rack will help you organize your storage bins, and Tommy will show you how to build it.
Let's see how your measurements went, Tommy.
Tom: So far, so good.
Kevin: On "Ask This Old House."
♪♪ ♪♪ ♪♪ Lee: Hello.
Hi, Rhonda.
I'm Lee Gilliam.
Nice to meet you.
Rhonda: Very nice to meet you, Lee.
I'm a big fan of yours.
I just want you to know.
Lee: I appreciate that.
I got an email from you... Rhonda: Yeah.
Lee: ...about your yard, wanting to get some work done.
Rhonda: Yeah.
Thank you for stopping over, I tell you.
Lee: No worries.
Beautiful space.
Rhonda: Oh, thank you very much.
We've tried.
We put in lots of work.
We put in these arborvitaes over on this side of the wall, and now we got this white fence.
Lee: Yeah.
Were some trees there earlier?
Rhonda: We had trees that were in the back of the fence at one time and our neighbors took them down... Lee: Okay.
Rhonda: ...and now we're kind of stumped at what we need to do next.
We got this wide-open canvas.
Lee: Sure.
Well, I think what we should do is try to break that fence up, put some texture on it.
I think we could use an arborvitae, but there's several different varieties, and I brought a few.
So I want you to look at them and see what you think.
Rhonda: Okay.
Sounds lovely.
Lee: Okay?
Let's go take a look.
Rhonda: Okay.
Lee: Alright.
Okay, Rhonda, I have three arborvitaes, different varieties, okay?
This one here's the Emerald Green.
Rhonda: Okay.
Lee: Compact.
Does get tall.
20 feet.
Rhonda: Okay.
So, is it going to stay as narrow?
Lee: Yes, it's narrow.
It's gonna get big, but it'll be narrow.
It's not gonna take up the space that I think we need.
Rhonda: Okay.
Lee: Okay?
Rhonda: It's beautiful.
It's nice and soft.
I love the texture of it.
Lee: Really nice.
Rhonda: Very pretty.
Lee: And then we have the Dark American, okay?
Rhonda: Okay.
Lee: Which is also a really nice arb.
Rhonda: Mm-hmm.
Lee: Gets tall, gets wide, but the issue I have with these are it has multiple leaders.
Rhonda: Multiple leaders?
Lee: Yeah.
It has the leaders growing up off the tree and then the branches growing off it.
Problem with that is, in this region where we are, if you get some heavy wet snow, it can open it up... Rhonda: Oh.
Lee: ...and then you have to maybe tie them up or maybe have to do some pruning on it and things like that.
Lee: That's not what we're looking to do.
Lee: Yeah.
But still, it's a nice plant.
Gets tall and all that.
Rhonda: Okay.
Lee: Alright?
And then the last one, which is my favorite, this one here called the Green Giant.
Rhonda: Beautiful.
Lee: Single leader.
Rhonda: Yeah?
Lee: Deer-resistant.
Rhonda: Okay.
Lee: And this one here likes to get big.
If you give this proper watering, this will grow 12 inches a year, and it should go up to about 30 to 40 feet high.
Rhonda: Do you think this one will spread out?
Lee: Yes, it does.
It gets really spread out on the base and grows up really tall, thin.
Rhonda: Okay.
Lee: But then it all catches up to it.
Rhonda: Okay, this is similar to what we have over on the other side of the yard.
So this is definitely the one that we're looking for.
Lee: Okay.
So I think what we need to do is figure out the arrangement and how you want to put them out and go from there.
What do you think?
Rhonda: Okay.
Sounds good.
Lee: Okay.
Great.
Rhonda: Let's do that.
Okay.
So, Lee, what are you thinking about for layout?
Lee: I like this layout, but let's try to mimic this on the other side, okay?
Rhonda: Okay.
Lee: And let's take some measurements down the end, and then we'll copy it on the other side.
Rhonda: Okay, perfect.
Lee: What do you think?
Rhonda: Alright.
I like it too.
Lee: Alright?
So, I'm gonna measure off the back of the fence.
Rhonda: Okay.
Lee: The bed.
Rhonda: Yeah.
Lee: Which is roughly 40 inches, okay?
Rhonda: Okay.
Yeah.
Lee: And then center to center of the tree -- so, this is the center of the tree, which would be the middle of the tree.
See in there?
Rhonda: Okay.
Lee: So we're gonna measure this like that.
And we're roughly five feet.
So each tree will be five feet.
Rhonda: Oh.
Lee: Roughly five feet.
Rhonda: About my height.
I'll lay down, and you can measure me.
Lee: Exactly, exactly, alright?
Rhonda: Oh, great.
Okay.
Lee: And then also gives room for the tree to grow down on the bottom.
Rhonda: I like it.
Lee: Alright, let's go to work.
Rhonda: Okay.
So, Lee, where are the shovels?
I don't see any shovels.
Lee: [ Chuckles ] Alright.
No shovels yet.
Rhonda: Okay.
Lee: What I want to try to do is create a bed.
And the reason why for the bed I'd like to do is so it protects the trees and it's easy to cut the grass.
You know, most people put the trees in the ground, right in, like, the grass, and then you're cutting around it and things like that.
So, I don't want to do that.
I want it to make it look aesthetically nice and also good for the plants.
Rhonda: How do we do that?
Lee: Okay?
So, what I'm gonna do is I'm going to give you this.
This is a spray can, okay?
Rhonda: Okay.
Lee: I'm gonna give you that, and I'm going to measure off 40 inches, like we have on the other bed.
So we'll copy that, okay?
Rhonda: Okay.
Perfect.
Lee: So, I'm gonna take this.
Rhonda: Okay.
Lee: If you can come over here and find 40.
Hold on.
Give me a second.
So, right...right there.
Shoot that right there.
Rhonda: Okay.
Right here?
Lee: Correct.
Beautiful.
And we're gonna slide down to the next one, okay?
We're gonna I'll repeat the same thing.
Rhonda: This is better than shoveling.
Lee: Yep.
So far, so good.
Rhonda: Okay.
Lee: Give me another one right there, 40 inches.
Rhonda: 40 inches.
Lee: Yep.
See it right there?
Beautiful.
Okay, so, let's mark this one here out.
Rhonda: Okay.
Lee: Again, 40 inches we're going off.
Rhonda: Okay.
Lee: Hold on.
See?
40 right there.
Bingo.
Rhonda: 40.
Lee: Yep.
Perfect.
Nice job.
Rhonda: Okay.
Lee: Okay, so, we know we have 40 inches off the fence.
Rhonda: Okay.
Lee: Alright?
So let's connect all our dots, okay?
Nice and straight.
Rhonda: Easy for you to say.
Lee: I know, right?
Rhonda: Okay.
Lee: Keep on coming.
Perfect.
Good job.
Rhonda: Thank you.
Lee: The next step is we're gonna bring in the sod cutter and we're going to take all this material out.
We're ready to rake some stuff up.
I want to put them in piles.
It's easy to move it around.
Rhonda: Okay.
Lee: So, I just want you to follow right behind me.
Let me make some piles, and then follow right behind me and get the loose stuff, okay?
Rhonda: Okay.
Lee: So, I'm gonna go like that.
Soil looks really good.
I think the trees are gonna be happy.
Nice job.
Rhonda: Okay.
I wasn't sure what was back here.
So, Lee, what is this machine?
Lee: Okay, this is a rototiller.
And what I want to do is rototill the soil, loosen it up, let some oxygen get in there, and that will help the soil and it'll help the plants as they want to grow.
See these blades?
Rhonda: Yeah.
Lee: That's gonna dig down into the soil, and that will make it so much easier when we're ready to plant.
[ Engine starts ] Okay.
Just pull it back to you.
Rhonda: And just back and forth.
Lee: Pull it back.
Pull it back.
There you go.
Nice.
Rhonda: Now, how often do I do this?
Lee: See how it's working its way down?
There you go.
Look at you.
Rhonda: Ooh!
Lee: Alright, we just finished rototilling, got some oxygen in the soil.
Soil looks really good.
So, what I want to do is use some fertilizer, okay?
Rhonda: Okay.
Lee: I like organic fertilizer here and some compost.
Rhonda: Okay.
Lee: So, compost is all organic.
Ground-up leaves and sticks.
Rhonda: Okay.
Lee: And then it... Rhonda: Looks like dirt.
Lee: They turn it -- It is a form of dirt.
And they turn it several times over the season, get the oxygen in there to break everything down, all the micro isms.
Okay, we're ready to dig some holes.
Rhonda: How deep are you gonna dig that hole?
Okay, I'm gonna dig it a little bit higher than the root ball, okay?
So, these root ball's are approximately 12 inches, okay?
So I'm gonna go probably about 11 inches down.
Rhonda: Okay, and then width is gonna be about the same?
Lee: No, the width is gonna be a little bit wider than the tree 'cause we're gonna backfill it in with all the organic material.
So, I think we're good.
Rhonda: Yeah?
Okay.
Lee: Okay?
So, one trick is, they put a shovel down... Rhonda: Yeah.
Lee: ...so you can get the measurement.
Rhonda: Okay.
Lee: So, we're there, right?
Rhonda: Yeah.
Perfect.
Lee: What do you think?
Look at all that.
See all the roots?
Rhonda: Wow.
Beautiful.
Lee: Yeah, not too bad, but it's all root-bound.
So what I want to do is, we take this, and we're gonna open it up a little bit.
See that?
Rhonda: Ooh, that's what they need, like scratching.
Lee: Scratching it up.
So, this is gonna help the tree go out.
Now what we do, gonna pop it right in the ground.
Look at that.
Rhonda: Perfect.
Lee: That's pretty good.
Rhonda: Yeah.
Lee: So, I'm gonna take some of the soil mixed in there with our compost and everything.
Rhonda: Yeah.
Lee: I'm just gonna backfill it all in.
Rhonda: And you do this for every tree?
Lee: Every single tree.
Okay, so, what do we have for the distance?
Do you remember?
Rhonda: Five feet!
Lee: Five feet.
Good job.
Rhonda: And we're going down about, what, 11 inches?
Lee: Yeah, 11 to 12 inches.
Rhonda: 11 to 12 inches.
And all I'm gonna do... Lee: Remember how I did it?
Rhonda: ...is pull this.
Lee: Yep.
Rhonda: Scrape it a little bit.
Lee: Perfect.
Rhonda: Okay.
We'll give it a little back rub.
That's what it's like.
Lee: That's it.
What do you think?
Rhonda: It's beautiful.
I love it!
Gonna to tell the whole world that I planted this tree.
Lee: Perfect.
Rhonda: Alright.
Lee: I have some nice organic compost mixed mulch, okay?
It will hold the moisture down on the plants.
Two inches of mulch is good.
Rhonda: Okay.
Lee: Alright.
Homework.
You ready?
Okay, I need you to water at least every day for two weeks, okay?
And if it rains, don't worry about it.
You know, don't get stressed over it.
But they need to be watered in.
Rhonda: Alright.
Lee: Alright.
Rhonda: I think I can handle that.
Lee: It was great meeting you.
Rhonda: Alright, Lee.
Lee: Thanks so much.
I appreciate it.
Rhonda: One of my biggest fans.
Lee: Thank you.
Rhonda: Thank you so much for your help.
I appreciate you.
Lee: Take care of yourself.
Rhonda: Take care.
Lee: Bye-bye.
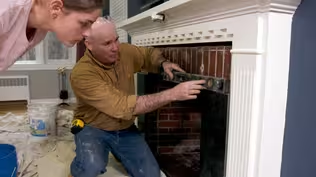
Kevin: Mark, if people do not know that you're a guy who loves a fire, they will after this.
Look at you.
Mark: Alright.
Kevin: You brought out all the toys.
Mark: I sure did.
So, what I wanted to show you today, Kevin, was just the tools of the fireplace.
Kevin: This is a tool.
Mark: And this is a tool.
We're gonna start with safety.
Kevin: Okay.
Mark: And obviously the extinguisher -- anything goes wrong, this is the piece to use.
Kevin: Don't play with fire.
Mark: Don't play with fire, folks.
Kevin: What else have you got in the safety category?
Mark: So, safety-wise, if you needed to move any logs, you're certainly not gonna stick your hand into the fire and grab anything.
But as you can see, these tongs, they separate, and... Kevin: You can actually get a grip.
You can move it around.
Mark: Move it around.
Kevin: Control if you want.
Mark: Yep.
Kevin: Boom.
Just like that.
Mark: Boom.
Kevin: Okay.
Safety.
Mark: Alright.
Next up, the screen.
So sparks are flying, not to use a cliché.
But usually in front of the fireplace is masonry, but beyond that is usually a wood floor.
So you want to keep the sparks at bay, which is exactly what the screen does.
Kevin: So nowadays a lot got doors, but open fireplaces, traditional, they do something like this.
Mark: Oh yeah, this comes in many shapes and forms.
Kevin: And that's a beauty, huh?
Is that from -- Mark: That's an antique.
It sure is.
Sure is.
Kevin: Alright.
I'm just going to set that aside right now.
So we've got some long matches.
Mark: Long matches.
Again, think of a short match, and here you are, and you're very close to the fire.
This will give you a little elbow room, as they say.
Kevin: Looks darn good by the side of the fireplace.
Mark: Sure does.
Yes.
Kevin: Alright, let's talk about function.
Mark: Okay.
Kevin: For helping us.
Mark: Most important thing about the function is going to be this grate.
This grate elevates the logs which obviously elevate the fire.
It provides us a space for air.
And that's what we need to keep a good fire going and to start it as well.
So.
Kevin: Okay.
And they're flanked by these guys right here.
These are what we call andirons.
They do the same thing as this grate does but they're more decorative, as you can see.
Kevin: And when it comes to the andirons, are you using them instead of the grate or in conjunction with the grate?
Mark: So I'll actually use them in conjunction only because I like them.
I like the decorative.
But push comes to shove, the grate is really all you need.
Kevin: Beautiful.
Alright.
Mark: Yep.
Kevin: You've got a poker on your stand.
Mark: I do, I do.
Kevin: Do you like to fuss with that and move your fire around?
Mark: That's exactly what it's for.
So anytime I need to move a log or jimmy a log around, this is what I use, yeah.
Okay.
What else we got on the rack right there?
I see a shovel and a broom.
Mark: Simple cleanup tools, Kevin.
Broom, again, comes in many shapes and forms.
The key component of this shovel is just that edge right there.
You want it to look like a dustpan and work like a dustpan, just like that, so.
Kevin: And clean it up when everything's cooled down.
Mark: That's right.
Kevin: Not right away.
Mark: Exactly.
Kevin: Those hot embers.
Alright.
This is awesome.
Man, these fires must be roaring in your house.
Mark: Well, the weather's coming.
Kevin: Alright.
Thank you, Mark.
Mark: You got it, Kevin.
Kevin: I'll be over.
Mark: Okay.
Kevin: Hey, Tommy.
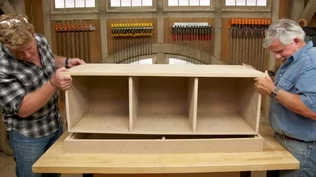
Tom: Hey, Kevin.
How are you?
Kevin: Alright.
Looks like you've got yourself a project in your mind here.
What are you thinking?
Tom: Well, I was thinking about using these totes.
You know, a lot of people use these to store a lot of stuff, off-season stuff like Christmas ornaments and stuff like that.
They put them in the garage or in their basement or whatever.
But to think about it, you put something in it, you put it on the floor, then you pile another one on top, another one before you got a stack, and you say, "I want the one on the bottom."
So I got to move all the ones on the top to get to the one on the bottom.
Kevin: Well, you should have put this one on the top.
Tom: I know, but I wasn't thinking.
Kevin: I got you.
Tom: So I thought I would make a rack to put them on.
Kevin: So something that you can sort of slide them in on a shelf.
Tom: Yeah.
Individually.
Go in, have the label on there.
"Oh, I want that one right there," and I'd pull that one out.
Kevin: Roger that.
Okay.
And you're thinking just sort of rough framing, just 2x4s?
Tom: You could use a 2x3, you could use a one-by.
But I look at a 2x4, it's not that much more money than the other material, but you've got plenty of meat to put your screws through it.
So we're going to use screws as opposed to nuts and bolts.
Kevin: Right.
And it looks like you chose an exterior screw, deck screws right here.
I guess if it's an unfinished space that'll do it.
Tom: Yeah.
Deck screws are great.
They won't rust.
They're better than a drywall screw.
Drywall screws are brittle.
They can snap.
But the interesting thing about a deck screw, at the tip of the screw is a little slot or a groove right there, like a drill bit that will actually drill a hole for the screw to set in, which means it's going to hold better and less chance of splitting the wood.
Kevin: Roger that.
And you're thinking maybe making it portable.
You got some -- Oh, swivels.
Four swivel wheels?
Tom: Yeah, four swivel wheels.
I mean, you could get them that don't swivel, but a swivel will allow you to pull it out, slide it, push it back in.
The other way, it's tough to do.
Kevin: Yeah, I'm on board.
Tom: Alright.
So the first thing I want to do is I want to make a template so we can position our cleats on the sides of the legs that are going to hold our totes.
Kevin: Okay, so make some marks so that we can repeat it on all the pieces.
Tom: Right.
Exactly.
So first thing I'm going to do is let's say this is going to be the upright side.
I'm going to measure the height of the box at the bottom of the cleat.
It's 13.5 inches.
So to the top of the cleat, it measures 13.5 inches.
But I want to put a one-inch space.
So I'm going to make it 14.5 inches.
And I'm going to come back down 3.5 inches to the bottom of the cleat.
Kevin: That's the width of your cleat.
Tom: That's right.
Right there.
Okay.
Now I have to measure up from the top of this part of the box right here to the top right here.
And I'm going to measure that.
2 inches.
I'm going to call it 3 inches.
Kevin: Give it another 1-inch gap.
Tom: Right.
So if I measure three inches right here from the top of that the cleat right there.
Okay.
Now from that mark to the next one up, 13.5 inches.
And I'm going to come back down 3.5 inches for the thickness of my 2x4 right there.
And I'm going to give me my 2.5-inch gap right here.
That will be the top where we cut that.
Kevin: So when you say top and bottom, you've got casters, wheels going on the bottom of this, right?
Tom: Right.
Kevin: So there's going to be a frame down here.
Tom: Going to be a frame down there.
And I'll just grab one more.
And there's going to be a frame going right here.
Kevin: Roger that.
Tom: Okay.
So think of this.
Have you got that?
Kevin: Yeah.
Tom: So I'm going to take and I'm going to slide this in.
Oh, let's get a cleat here so you can see it.
Kevin: As if this is our side cleat.
Tom: So now I'm going to take this and I'm going to slide it in on that cleat.
It's going to create a little gap on the bottom.
Kevin: Rest on that cleat.
Leave a gap there.
Tom: So it can slide in and out.
Now if you take that cleat and move it up, put it on the line like that.
When I slide this in on this, it'll hang on that cleat.
I have my one-inch space above that my piece is going to run across.
Kevin: And then you're expecting there to be a top bracket right there.
Tom: That holds the top of the piece together.
And we have the gap that we need between the two totes right here.
Kevin: Got it.
Tom: Alright.
So let me line this up.
Okay.
Okay.
Kevin: Good.
Tom: So we'll cut eight of these for the uprights.
Alright, now that we have all of our uprights cut, we want to make them all even, and we want to try to make them square with the table.
I'm going to take our piece that we marked for our template piece and mark right across.
And there's the top right here.
Put where our two-by is going to go.
You see it?
Kevin: To you a little bit.
There.
Tom: So now we have to cut our cleats for the boxes to slide on.
So I mark this at 30 inches.
Kevin: So how long are the totes?
Tom: Tote boxes are about 29 inches, so we're going to make these 30 so it'll be a little bit deeper so they'll sit inside the frame.
Kevin: Okay.
You're good.
Tom: Alright.
Now, what we need to do is figure out our spacing for our upright.
First thing we want to do is measure the width of our container, which is 19.5 inches.
If we allow a half an inch on each side, it'll be 20.5 inches because we have some play.
We want it to fit in between the two by fours.
Kevin: Okay.
Tom: Alright.
Kevin: And we've got -- We've got a 2x4 on the outsides, right?
Tom: Yep.
Kevin: So if that represents our outside upright.
Tom: So if I measure between here, 20.5 inches and 1.5 inches, because that's the thickness.
Kevin: This will be our second upright.
Tom: Yep.
And I go 20.5 inches again.
That's between the uprights.
And 22 inches, and the 1.5 inch.
Okay.
And now we go here.
20.5 inches and 1.5 inches is 22 inches.
Kevin: So this would represent our third upright.
Whoops, right there.
So we'd have a bin go between, a bin go between, a bin go between.
Tom: Alright, so now if we measure all the way down to the outside here to the outside of this one, I am 67.5 inches.
That's the length for our four pieces.
Two at the top, two at the bottom.
Now to give the rack some lateral stability, we're going to cut four diagonal blocks to nail on the back.
And that will keep it stiff.
Now we can start assembling the shelves.
Remember, I don't need to drill pilot holes because I'm using deck screws that are designed to minimize wood splitting.
All of our upper and lower plates are marked for the location for the sides and the end, so we can start fastening them right now.
♪♪ ♪♪ Just check it real quick, see if it's square.
♪♪ Kevin: Middle.
Tom: We are 1/32 of an inch off.
I think that's close enough.
♪♪ Finally, we can add casters to the bottom.
I'll install wheels on each of the four corners and secure them using a short structural screw.
Kevin: Let's see how your measurements went, Tommy.
Tom: So far, so good.
Kevin: Okay.
Tom: There you go.
Kevin: The bins are in.
Everything fits.
Look, it's got a nice roll to it.
Tom: You can put it anywhere you go.
Real easy.
Kevin: Six bins -- That's a lot of storage right there.
That's a lot of Christmas ornaments.
Tom: There is a lot of storage there.
Yeah, a lot of Christmas ornaments.
Kevin: And, you know, the bins aren't that expensive.
It's just 2x4s.
So a nice utilitarian project.
Tom: It's economical.
A fast way to build.
Kevin: Nice job, Tommy.
Tom: My pleasure.
Thanks for the help.
Kevin: Alright, well, that's it for us.
So until next time, I'm Kevin O'Connor.
Tom: I'm Tom Silva.
Kevin: For "Ask This Old House."
♪♪ ♪♪ Kevin: Next time on "Ask This Old House," Jenn visits a sod farm to learn about some innovations in grass alternatives.
Then Tommy gives us a lesson on nails, their sizes and uses.
And Heath offers a smart solution to a homeowner struggling with lighting their outdoor space.
Woman: It looks amazing.
Thank you so much, Heath.
Kevin: All that on "Ask This Old House."


- Home and How To

Hit the road in a classic car for a tour through Great Britain with two antiques experts.


Careers that Work


Support for PBS provided by:
Funding for Ask THIS OLD HOUSE is provided by The Home Depot and Renewal By Andersen.