E13 | Beehives 101, Step Stool | Ask This Old House
Season 23 Episode 13 | 23m 42sVideo has Closed Captions
Jenn learns about bees; apps the ATOH team is using; Tom and Kevin build a step stool.
Jenn Nawada meets with a Detroit beekeeper and learns about bees, how honey is harvested, and tips on how to start your own hive; Ross Trethewey, Heath Eastman, and Lee Gilliam share a few phone apps they've been using in the field lately that has made their work easier; Tom Silva and Kevin O'Connor build a step stool using a mobile CNC router.
Funding for THIS OLD HOUSE is provided by The Home Depot and Renewal By Andersen.
Support provided by:


E13 | Beehives 101, Step Stool | Ask This Old House
Season 23 Episode 13 | 23m 42sVideo has Closed Captions
Jenn Nawada meets with a Detroit beekeeper and learns about bees, how honey is harvested, and tips on how to start your own hive; Ross Trethewey, Heath Eastman, and Lee Gilliam share a few phone apps they've been using in the field lately that has made their work easier; Tom Silva and Kevin O'Connor build a step stool using a mobile CNC router.
How to Watch Ask This Old House
Ask This Old House is available to stream on pbs.org and the free PBS App, available on iPhone, Apple TV, Android TV, Android smartphones, Amazon Fire TV, Amazon Fire Tablet, Roku, Samsung Smart TV, and Vizio.
Keep Exploring


This Old House Insider Newsletter
Get This Old House exclusive stories, tips, and behind-the-scenes information delivered right to your inbox every month.Providing Support for PBS.org
Learn Moreabout PBS online sponsorship♪♪ Kevin: On "Ask This Old House," our experts travel across the country to answer questions about your house.
♪♪ Today, Jenn gets a lesson in beekeeping.
Nicole: We have thousands of worker bees inside the hive.
Then there are hundreds of drones.
And then you have the queen.
There's one queen bee per hive.
Kevin: Then our team shares some apps that help make their lives easier.
Heath: Search exactly what you're looking for.
Do the calculation.
Move right on.
Kevin: And Tommy uses a special router to help him build a toddler's step stool.
On "Ask This Old House."
♪♪ Jenn: Beekeeping has been popular for a while, and more and more people want to learn how to start their own hive.
This has been good for the bee population, which have been in recent decline.
I'm on my way to Detroit to learn from a beekeeper how to start your own hives.
♪♪ Alright, so I'm really excited to check out your hives here.
And I'd love you to walk me through how a hive works.
Nicole: Yeah, absolutely, Jenn.
We'll go inside, inspect, and we'll talk about the inner workings of this magical honeybee colony.
Jenn: Okay.
Great.
What's that in your hand?
Nicole: So this right here is our smoker tool.
We use this to kind of calm the bees down.
Um, if the guard bees emit a scent, um, like an alert scent, it kind of smells like bananas.
Jenn: Okay.
Nicole: So sometimes we use this to mask off that banana scent, so they can't communicate that with the rest of the guard bees.
Jenn: So they don't get angry?
Nicole: Yeah.
Jenn: Okay.
Nicole: We're probably just gonna need a little bit of the smoke just to calm them down, but just to let the girls know we're getting ready to go inside.
But before we go inside, we gotta make sure we say hi to our girls and our boys.
Jenn: Okay, okay.
Nicole: Alright.
So, hi, girls and boys.
Jenn: Hey, girls and boys.
Nicole: [ Laughs ] And you see how quiet and calm they are.
They're not really paying attention to what we're doing.
Jenn: I love that.
Nicole: Yeah.
So these girls are busy at work.
So, the worker bees are all female.
They do all the work inside and outside of the hive.
Jenn: Okay.
Nicole: Um, so they have stingers to protect the hive.
So, there are thousands of worker bees inside the hive.
Then there are hundreds of drones.
The drones are the male bees.
Jenn: Okay.
Nicole: Um, and then you have the queen.
There's one queen bee per hive.
And so with that queen, she can live up to possibly three to five years.
And her entire life is just laying eggs.
Jenn: Royalty.
Nicole: Yeah.
But also, um, she doesn't feed or clean herself, so she needs the help of the worker bees to feed and clean her.
Jenn: Mm.
What's that tool in your hand called?
Nicole: This is called a hive tool.
So this is what we use to pry open the boxes.
So what are we putting up here is going to be a honey frame.
Jenn: Are they like that on both sides?
Nicole: Yeah.
Jenn: Yeah.
Nicole: So you can see where they deposit that nectar in.
Jenn: That's fascinating.
Nicole: So, our forger bees, they have the job of going out and collecting the food, which is in the form of nectar and pollen.
They'll go out to the flowers and visit them.
They'll collect it.
Honeybees have two stomachs, and so one stomach is for carrying the honey and one is for digestion.
Jenn: Okay.
Nicole: So the majority of that nectar will go into her honey stomach.
She'll come back to the hive, meet with one of her sisters, and she'll regurgitate that nectar, and they'll collect it in their stomach and begin to collect their enzymes.
They'll repeat this step several times with the worker bees.
The last one will deposit it into the honeycomb, so they're depositing that nectar.
So if you see some of the fanners right there at the end, they'll fan out 80% of that water content.
This is where nectar... Jenn: Look at that.
Nicole: Yep.
It's transformed into honey.
Jenn: Okay.
Nicole: So honey can last for thousands of years.
Jenn: Right.
Nicole: The oldest honey that was collected was over 2,000 years old.
And it was in a tomb of Egypt.
Jenn: No way.
Nicole: But we make sure that we leave about 100 pounds of honey for them to survive over the wintertime.
Also, another thing that we do is we winterize our hive.
Because we're here in Michigan, we go through winters.
Jenn: Cold, cold.
Nicole: So anytime temperatures are 45 degrees and below, those bees will cluster up with the queen sitting in the middle.
They'll vibrate their wing muscles -- Jenn: To protect her.
Nicole: Yeah, to keep warm.
Jenn: They're so loyal.
Nicole: Yeah, they are.
So they're a superorganism.
So they all work together for the greater good of that colony.
I'm going to check in this bottom box.
So, the bottom three boxes are our brood chambers.
Jenn: Okay.
Nicole: And that's where the queen is laying her eggs.
So I like to talk to my bees.
So if you hear me saying, "oh, excuse me, baby, hey, baby," these are my girls.
Jenn: Yeah, you could tell the difference in size.
Look at that.
Nicole: Yeah.
Jenn: Oh, wow.
Nicole: So I thought I saw that bee dead, but I'm gonna let you hold this and then let you inspect it more, so you're gonna put your hands in a fist.
Jenn: Fist.
Nicole: With your thumbs up.
There you go.
You're gonna grab it with your thumbs.
Jenn: Thumbs?
Nicole: Yep.
Just like that.
Let me know if you got it secure.
Jenn: I got it secure.
Nicole: There you go.
So, right here is where the drone cells are.
The flat surface is going to be our worker bees.
Jenn: Look at that.
I can -- You can see all the honey beneath.
Nicole: All honey on top.
Jenn: Those are all sealed off.
Nicole: Yep.
So this is all capped honey.
So, the way the honey bees do it is that the food is on top.
Kind of like a rainbow, you see.
Jenn: And then how do you remove the honeycomb from here?
Nicole: So, we have like an extraction knife that kind of caps -- the capping knife -- and that caps off that first layer of wax.
Jenn: Mm-hmm.
Nicole: We can either do it by hand and use like a cheesecloth and kind of squeeze it.
But most of the time we use an extractor.
We just place in the extractor.
And it just spins that honey out of the cell.
Jenn: Okay.
And then you put the comb -- keep the combs back?
Nicole: Yep.
I keep the combs because it's -- we're all about conservation.
Jenn: Yeah.
Nicole: It's less work for them.
So all they have to do is... Jenn: Right.
Fill it again.
Nicole: ...fill it back up again, yep.
Jenn: Right, right, right.
Nicole: So if you want to place that back in, you're gonna do it real gentle, probably put your... Yep.
Jenn: So if someone's thinking about starting a hive, how would you recommend the steps?
Nicole: Yeah.
So some of the steps that we took was education.
So looking for courses.
Jenn: Yeah.
Nicole: Finding a beekeeper association in your, you know, local area.
Um, they have tons of classes, hands-on classes, so you can get your hands on it and learn how to beekeep.
And a lot of them will teach you how to beekeep throughout the season.
Jenn: Okay.
Nicole: So first things first is joining an organization.
Also with that organization, um, that association, there are people there that you can get mentors from.
You can also get your beekeeping supplies from, you know, where to order your bees.
Jenn: So inform yourself first before you just buy all the equipment.
Nicole: Right.
Yeah.
Jenn: That's very important.
Yeah.
And I would do it over and over.
Right?
Nicole: Yeah.
Jenn: Really have a full understanding of how the whole system works.
Nicole: Yeah.
Jenn: From here all the way over to the pollinator plants.
Nicole: Yeah, absolutely.
And there's so many different species of bees.
In the United States, we have almost about 5,000.
And in the world that's almost 20,000.
Jenn: Okay.
Nicole: Yeah.
So how we can help the bees is planting pollinator gardens, using less chemicals.
Jenn: Right.
Nicole: So we got to make sure that we're using less pesticides.
But planting diverse, native flowers.
Jenn: Right.
Nicole: Alright, Jenn, would you like to try some of the honey straight from the hive?
Jenn: Ah, you don't understand how much I love honey.
Nicole: Yeah.
Jenn: Absolutely.
♪♪ Alright, so I've got my little sticks.
What should I do to not harm this?
Nicole: No, you're fine.
Jenn: Okay.
Nicole: So just go anywhere where it's capped off at.
Jenn: You mean where it's white?
Nicole: Yep.
Jenn: And just squeeze in?
Nicole: Yep.
And just dig right on in.
Jenn: Oh, my God!
Nicole: Yeah.
That's our deliciously dope Detroit hives honey, straight from the hive.
[ Laughs ] Jenn: Oh, my God.
Oh, my God!
Nicole: Yes.
Jenn: I'm gonna lick my hands.
Nicole: [ Laughs ] Jenn: Oh, my God.
Nicole: Yeah, it's all good.
I say our honey tastes like -- like natural Skittles because you get like a robust taste, like, all over your palate.
So yeah.
Jenn: Oh, my gosh, thank you for that experience.
Nicole: Yeah.
You're welcome.
Jenn: So it's not that hard.
Educate yourself first.
Nicole: Absolutely.
And you have a sweet treat afterwards.
Jenn: Yeah.
Thank you, Nicole, for all this information.
And good luck spreading the word around here.
Nicole: Yeah.
Thank you.
We love it.
♪♪ Lee: Plant or plant?
Kevin: You see, that's the problem with kids of your generation.
You're always on your phones.
Heath: I swear we're working.
Kevin: Oh, yeah.
Heath: We are.
Kevin: What are you working on?
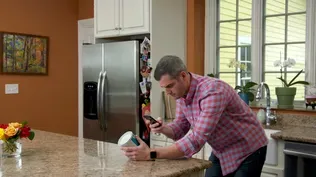
Heath: So we're actually looking at apps that help us with our individual industries.
Kevin: Oh, okay.
That passes.
What do you got?
You got apps that you use?
Heath: I do.
So for me, you know, we're going to reference my code book all the time, our Bible.
Kevin: This is seriously your Bible?
Heath: Yeah.
Kevin: You need a new religion.
[ Laughter ] This thing.
You got to refer to this?
Heath: We refer to this.
It's not quite as bad as you think, but it's a pretty big book.
Kevin: Oh, it's worse.
[ Laughter ] Heath: Luckily, someone makes a CliffNote version.
Kevin: A little version of this one?
That's not -- Heath: That's it.
Kevin: Hang on a second.
Is it really called Ugly's?
Heath: It's really called Ugly's.
It's been around a long time, and we found out the name came from the guy that created it.
So he was an electrician, but he was also a boxer, and his nickname was "Ugly."
Kevin: That's awesome.
"Ugly goes down in the sixth round!"
Anyway, handy.
Heath: CliffNote version of this.
It does the majority of what we do during the course of the day.
You know, box fill, conduit fill, and pass the wires, that kind of thing.
Kevin: Yeah.
Heath: But now an app version of it, it'll give us all the basic tables we're going to use, but it also has a search function.
Kevin: Nice.
Heath: Search exactly what you're looking for.
Do the calculation.
Move right on.
Kevin: Heath's got Ugly on the phone.
Heath: Ugly on the phone.
Kevin: I like it.
Alright.
How about... Mm, no, no, we might run out of time.
Lee, we're going to let you get in here first, this guy.
Lee: The app I'm using is PictureThis.
Walking around the yard first with a customer, whatever you're doing, you see something, you might not know about it.
So you go in the app, hit it, scans it, tells you what it is, tells you if it's toxic, not toxic.
Good for the kids.
When's it flower?
What's it need for fertilizer, things like that.
Really good app.
Kevin: How's it doing?
Lee: Doing okay.
This thing's nice and healthy.
Kevin: Doing better than your profession, pal.
You're going to be out of a job.
Ross: That's pretty cool.
Kevin: Nah, you'll never be out of a job.
Lee: I'm still good.
Kevin: Alright.
Ross: We got apps.
Kevin: You and I have probably done like three or four sections on apps.
You got more?
Ross: Got more apps.
Yeah, a lot of apps.
I mean, so we got a couple different things.
We got the tools.
Right?
So a lot of manufacturers are making tools now that interact with a phone.
So if you want to measure air handler performance, if you want to track static pressure, if you want to track indoor air quality, you want to data log temperature, relative humidity, all that stuff comes through the app on the phone.
So there's those tools.
They're super helpful.
Make our lives a lot easier.
Kevin: Are they coming over to the phone like in real time?
Ross: Real time.
And then you can also -- In a lot of those you can data log.
So you can set it and then come back and basically download the data.
Kevin: That's powerful.
Ross: So that's really powerful.
And then take that a step further, there's the calculators.
So we have one like the Ductulator.
We have the Psychro app.
These are ones that basically -- Kevin: Oh, hey, excuse me, hang on, full stop.
I thought -- I thought that was a good name.
[ Laughter ] Ductulator?
Ross: Ductulator.
Kevin: Seriously?
Heath: He wins.
Ross: Yeah, yeah.
Kevin: Total win.
Ross: I'll tell you.
Yeah.
Take the -- Heath: [ Laughs ] Kevin: Somebody get me the Ductulator!
Ross: It's a great app.
It's a great app.
So, for example, I can put an air flow rate in of 100 CFM and a friction rate limit of 0.07.
And if I click on this duct, it's going to tell me 100 CFM, I can go through a 4x10 duct, so I can make sure that my duct system is going to work with the air handler that we have.
Kevin: Wow!
Ross: Yeah, yeah.
Right there.
Boom.
Kevin: You are so excited about the Ductulator.
Ross: I mean, it's -- Kevin: What am I using?
Thanks for asking, guys, by the way.
I'm still using a photo app.
Have you met the two new additions to the family?
Heath: Look at those two.
Kevin: Ah, love that.
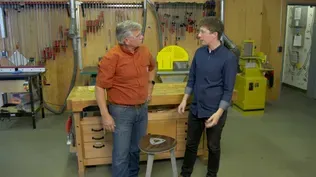
♪♪ Hey, Tommy.
Tom: Hey, Kevin.
How are ya?
Kevin: Alright.
How ya doing?
Tom: I'm alright.
Kevin: Looking at some projects for us?
Tom: I'm looking at some different projects.
I think I'm gonna choose this one right here because it looks a little different.
Kevin: Oh, sure is different, indeed.
Looks, um, complicated, actually.
Tom: It does look a little complicated, but I need a good challenge, and I think I can do it.
Kevin: So, it's a little tiny step stool?
Is that what I'm seeing?
Tom: Yeah, yeah.
A little step stool cut with some curves.
And I'm going to do it with a router right here.
But there's a computer in there that will tell me where to go and correct me as I go along if I make any mistakes.
Kevin: So you're not going to have to freehand that shape right there?
You basically load a plan into that?
Tom: You load the plan into here, I guide the router around and it tells me where to go.
Kevin: I'm feeling better about the project now.
Okay.
I'm intrigued.
What do we do to start?
Tom: Well, the first thing -- we'll prep the area so we can start doing our layout.
Kevin: Okay.
Tom: Alright.
So we're going to lay a piece of plywood.
We have this scrap piece.
This will just protect the table.
So when we cut through our finished plywood, it doesn't damage the table.
So let's just put a couple of clamps up here, out of the way.
That should be good.
Okay, so this is the piece that we'll make our legs out of.
This is basically Baltic birch.
You see the edge here.
You can see all the veneers.
There's a lot of veneers in this Baltic birch.
There's like 14 or 15 veneers.
That'll accent the leg a little bit too.
Kevin: Okay.
Tom: But the plywood is nice and straight.
Alright.
So now to hold this down so it doesn't move, we're going to use some two-face tape underneath this.
But also as we cut our pieces out when we get done with the last cut, for example, we don't want that piece to move because if it hits the router when it's spinning, it could damage it.
Kevin: So we want this to stay in place even after we cut.
Tom: Move this out of the way.
Get some two-face tape, and we don't want this to move, so we'll probably put maybe three or four strips.
We want to make sure that there's no dust on the plywood also.
We want it to really stick well.
Okay.
Now did you brush off the dust?
Kevin: No.
Tom: Now just lay it back down.
The next thing we're going to do is we got to be able to guide the router, keep control.
So we're going to use this tape right here.
It's like dominoes.
See that?
But all of them are a little bit different.
And that's what the computer in the router will read.
Kevin: Yeah.
Tom: And we just place this on here.
Any direction, any angle, doesn't matter.
Kevin: And you're just doing it -- what?
-- every couple inches?
Tom: Every two, three inches, yeah.
The more you put, the more accurate you'll be.
The router will pick up on it.
And this is sacrificial.
I mean, this is basically something that you'd use for every project.
Kevin: Router's just going to cut right through that and then we'll just peel it off the finished product?
Tom: Yep, yeah.
Kevin: That's interesting.
Tom: Yeah.
And now we have to transfer this grid into the computer.
We're going to do a new scan right here.
And we're going to follow all of this.
And basically we're creating a workplace.
Alright?
And the workplace tells us where we're going to position our piece for the cuts.
Kevin: So the router's got a light, a camera, and then a screen so you can see what it sees.
Tom: Yeah.
And you can see that it's picking up all of those dominoes and turning them blue.
Kevin: Each black rectangle goes blue.
That tells you that the router has seen them.
Tom: Right.
Okay.
So now that I've got everything scanned in, alright, now we want to create a grid.
So we want to take the X-Y axis off of these edges right here.
Kevin: Mm-hmm.
Tom: So to do that, I'll drop the router down... ...and I bring it up to the edge and touch it.
Hit it.
Kevin: Look at that.
Tom: Two.
Kevin: Hm.
So that's setting your X-Y axis.
Tom: Right.
Okay.
So now I want to download our project.
Kevin: So the one that we were looking at on the computer, that's got templates, information, all that?
You just download it to this machine?
Tom: It's right here and it's ready to go.
So I hit that.
Now it's right there and now I can place it where I want to place it.
So I bring it around, and you can see my X-Y axis and all my dominoes.
So I can pull it up like this and move it, and then just -- oh, let's say -- let's come down a little bit right here.
Kevin: So this would help you maximi-- minimize waste, for example?
Tom: Right.
Kevin: Or make sure that you fall within your workspace?
Tom: Right.
So actually what I'm going to do is I'm going to cut -- I'm going to place this and cut this one.
Then I'm going to move this over and place this one and maybe up a little bit, so I can use that piece in the middle, maybe for a step.
Kevin: Clever.
Tom: Yeah.
It's the Yankee in me, you know?
The next thing we want to do is we want to change our bit that we used to create our X-Y axis and put in a bit that we're going to cut with.
So this bit right here, see, that's a engraving bit.
Kevin: Engraved there.
But you use the smooth... Tom: Right.
Kevin: ...full-dimension side.
Tom: Right.
Because if we hung the bit, the cutting bit down, if you look, there's a section where we could be wrong if we hit the inside.
We'd have to make sure that we get the outside.
To take the guesswork out, we use the upside-down bit.
So now I'm going to change this, put it in.
Alright.
Now, this cutting bit is an eight-millimeter diameter.
And we'll set that on the router.
Put that in.
Okay.
So now I have one more thing that I have to do is I have to set my Z cut.
So we've done X, Y, and now it's Z.
And basically, as you can see right there, it says Z touch.
That means it locates itself up and down.
So if I hit the Z, it goes down, touches, and comes back up.
Kevin: It zeros out the depth of your cutting blade?
Tom: Right, and all the measurements that I give it, once we're ready to start cutting from the zero mark.
Kevin: So does it know that it is a 3/4-inch-thick piece of ply, or do you have to now tell it that?
Tom: I'll tell it what it is.
So right now it's actually set at 3/4 inch right there.
And there's a little button right here that says AutoPass.
So if I hit AutoPass, that means that it's going to do it in four passes.
But I don't want to do three-quarter or full cut at once.
You want to do it in gradual.
It's like whatever the thickness of the bit is and let's say it's a quarter-inch bit, then you don't want to do any deeper than a quarter-inch cut.
And that's true with whether you're using this -- this machine or a regular router.
You never want to take your bit and go too deep, so it will automatically drop when it gets to the point that I started.
Kevin: So it's going to know that you cut over here.
Tom: Yeah.
Kevin: And when you come back to over here, it knows to drop it down the next quarter of an inch.
Tom: Next quarter of an inch.
It'll actually go right down.
Kevin: Are you going to do anything or is the machine going to do everything?
Because this sounds like a project for me.
Tom: You are going to do it.
So then I position it, pull it in.
And now... Kevin: Look at that.
Tom: We have a line that's moving.
We have a green line.
That is the edge of our leg.
Kevin: So it basically gives you a road map.
Tom: Gives you a road map.
And the line that's moving is the direction that we're going to go.
Kevin: Hmm.
Tom: Now I come around the corner.
Look.
So that's showing where I'm cutting.
Go right around.
Kevin: Even if you wiggle but you stay -- if you keep the large circle on your road map.
Tom: Yeah.
See?
I'm going back and forth with the router.
But look at the -- Kevin: Center dot.
Tom: Look at that.
Kevin: So the blade, your bit, is actually making minor adjustments right here.
If you stay between the lines but go a little crooked, it will make the adjustment for you.
Tom: Yep, you'll watch this moving.
Kevin: It's a portable CNC machine in your hands.
Tom: It is a portable CNC machine.
Absolutely right.
♪♪ ♪♪ ♪♪ Okay.
Kevin: So we've got these two little blocks that you made just to fill in these two dados.
Tom: Yeah.
It's going to be for two reasons.
That holds them together like that.
So we know they're the same.
Now we can just sand them.
But also we're going to take a router and run a chamfering bit here with a guide.
And I don't want the guide to fall into the dado.
Kevin: Roger that.
So you got a trim router?
Tom: Yep.
Kevin: Just gonna freehand it?
Tom: Single-handed, yeah.
♪♪ Alright.
I guess we're ready to glue this together.
Put some glue in the dado.
♪♪ Kevin: Alright, Thomas, you got an X on this one.
Tom: Yeah.
The X goes right here.
And that's to line up all the holes that was already been pre-drilled.
♪♪ Alright.
Nice and tight.
Kevin: Got the glue off right there.
Tom: Yeah.
Looks good.
Kevin: Looks better than good, Tommy.
That thing looks awesome.
I love that sort of sweeping line of the legs right there.
Tom: I love it.
Kevin: It's a little step stool for a little kid or something.
And finish?
What do you think?
Tom: Yeah, I think you definitely want to put a finish on it if it's going to be used, like, in a bathroom to wash his hands, brush his teeth or whatever.
Gets up on the stool.
So you want to protect it.
So you could clear coat it, you could stain it or even paint it.
Kevin: Alright.
Nice little project.
Well done.
Tom: It was fun.
Thanks for your help.
Kevin: Absolutely.
Alright, well, that's it for us.
But we got more coming up next time.
So until then, I'm Kevin O'Connor.
Tom: I'm Tom Silva.
Kevin: For "Ask This Old House."
♪♪ ♪♪ Kevin: Next time on "Ask This Old House," Mauro shows a homeowner a seamless way to paint his wainscoting.
Mauro: It dries really fast so we can get a lot of work done.
Kevin: Then Heath and Ross talk about the move to an all-electric house and what that means for homeowners.
And it's all hands on deck, big and small, when Nathan builds a sandbox.
Boy: This is a lot of work though.
Nathan: Yes, sir.
Kevin: All that on "Ask This Old House."


Funding for THIS OLD HOUSE is provided by The Home Depot and Renewal By Andersen.